Table of Contents
Let's be honest, those fancy pre-built playground sets cost a small fortune, often leaving your wallet lighter than a toddler's balloon. Meanwhile, the backyard might look less like a fun zone and more like... well, just a yard. But what if you could ditch the sky-high price tag and create a genuinely awesome play space yourself? Building your own diy backyard playground equipment is more achievable than you think. It’s a way to save significant cash, tailor the setup precisely to your kids' ages and interests, and maybe even get your hands dirty in a satisfying way.
Why Build DIY Backyard Playground Equipment?
Why Build DIY Backyard Playground Equipment?
The Hard Truth About Playground Costs
Let's cut to the chase. You've probably browsed the big box stores or online retailers, maybe even peeked at those glossy catalogs. The numbers on pre-made playground sets can be startling, bordering on offensive. We're talking thousands, sometimes tens of thousands, for something that might not even fit your space or have the features your kids actually want. Building your own diy backyard playground equipment sidesteps this financial hit directly. You buy the raw materials, you put in the labor, and the savings are substantial. It's like paying wholesale instead of inflated retail, but with the added bonus of knowing exactly what went into it.
Tailor-Made Fun, Not Off-the-Rack
Kids aren't one-size-fits-all, so why should their playground be? A store-bought set comes with a fixed slide, a couple of swings, maybe a climbing wall that's too easy or too hard. When you build your own diy backyard playground equipment, you're the architect. Got a future ninja warrior? Add monkey bars and a rope climb. Have a toddler who loves sand? Design a massive sandbox integrated into the structure. You can adapt the design as your kids grow, adding or changing features to keep it relevant and challenging. This isn't just a play structure; it's a dynamic play environment specifically designed for *your* children.
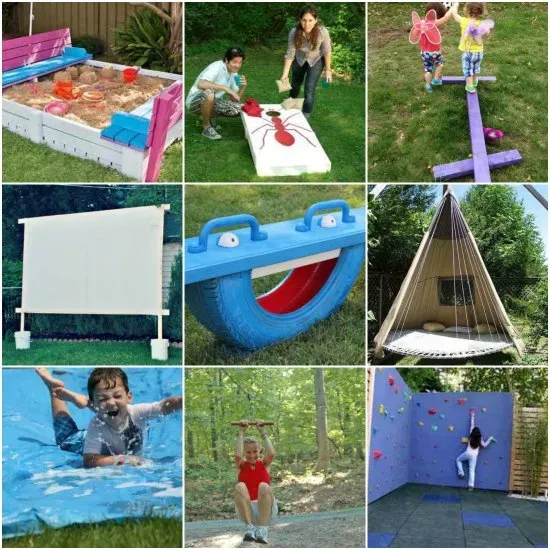
Common Playground Features to Consider:
- Swings (belt swings, infant swings, tire swings)
- Slides (straight, wavy, tube)
- Climbing walls or nets
- Monkey bars or overhead ladders
- Sandboxes
- Rope climbs or cargo nets
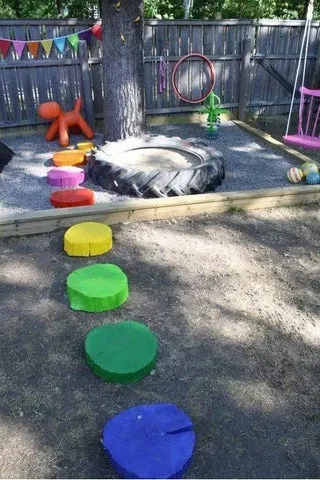
- Balance beams or stepping stones
- Forts or playhouses
- Zip lines (requires careful planning!)
More Than Just a Structure: Building Skills and Pride
There's a different kind of satisfaction that comes from pointing at something you built with your own two hands and saying, "I made that." Building diy backyard playground equipment isn't just about the end product; it's about the process. You learn new skills – measuring twice and cutting once becomes a mantra, you figure out how to set posts that won't budge, and you gain a practical understanding of physics and engineering (even if it's just figuring out how to make a swing hang straight). It’s a tangible project with a clear, rewarding outcome. Plus, involving the kids in age-appropriate ways (like carrying lighter lumber or helping with paint) can teach them about hard work and the value of creation.
Planning Your DIY Backyard Playground: Cost and Layout
Planning Your DIY Backyard Playground: Cost and Layout
Crunching the Numbers: What DIY Really Costs
Alright, let's talk money. The big promise of building your own diy backyard playground equipment is saving a bundle, and that holds true. But it's not free. You're looking at lumber, hardware (think bolts, screws, hangers), swings, slides, perhaps a climbing wall kit, and materials for the ground surface. A realistic estimate for a decent-sized structure, maybe with a couple of swings, a slide, and a small fort area, often falls somewhere between $800 and $1,500. Compare that to the $3,500 to $5,000+ for a comparable pre-fab kit, and the math starts looking pretty good. Remember, this is for materials. Your time is the sweat equity you're investing.
Mapping Your Fun Zone: Space and Buffer
Before you buy a single piece of wood, stare at your backyard. Really look at it. Where does the sun hit? Are there trees you need to work around? How much actual space do you have? A typical, functional playground footprint needs roughly 100 square feet for the structure itself. But here's the critical part nobody should skip: the buffer zone. You need a safety perimeter around the equipment where kids can fall or jump off without landing on concrete or the garden gnome collection. Experts recommend a buffer of at least 6 feet in all directions from the edge of the equipment, and even more (like 16 feet) in areas where swings or zip lines will be active. Ignoring this step is just asking for scraped knees, or worse.
Recommended Safety Buffer Zones:
- Around stationary equipment (forts, climbing walls): Minimum 6 feet (2 meters)
- In front and back of swings: Minimum 16 feet (5 meters)
- At the end of slides: Minimum 6 feet (2 meters)
- Underneath equipment: Must have impact-absorbing surfacing
Don't Skip This: Permits and Local Codes
Nobody likes dealing with bureaucracy, but ignoring local building codes or HOA rules when constructing diy backyard playground equipment can cause bigger headaches down the road. Most areas have regulations regarding structure height, setbacks from property lines, and sometimes even specific safety standards for residential play equipment. A quick call or visit to your local building department or checking your HOA's covenants can save you from having to tear down your hard work later. It’s boring, yes, but essential planning.
Safety First: Materials for DIY Backyard Playground Equipment
Safety First: Materials for DIY Backyard Playground Equipment
Picking Lumber That Won't Quit (Or Splinter)
Building safe diy backyard playground equipment starts with the foundation – the wood. You can't just grab any old lumber. You need stuff that can withstand kids climbing all over it, rain, sun, snow, and whatever else the weather throws at it. Pressure-treated lumber is the go-to for outdoor structures because it resists rot and insects. Look for lumber treated for "ground contact" if any part of your structure will touch the soil. There was a time when arsenic was used in treatment, but modern residential lumber treatment is generally considered safe for play structures. Still, if you're twitchy about chemicals, cedar or redwood are naturally rot-resistant but come with a higher price tag. Pine is cheaper but needs regular sealing and vigilance against rot.
Hardware Stronger Than a Toddler's Grip
Your structure is only as strong as its weakest link, and often, that's the hardware. Don't cheap out on bolts, screws, and hangers when building diy backyard playground equipment. You need hot-dipped galvanized or stainless steel fasteners. Why? Because they resist rust and corrosion. A rusty bolt isn't just ugly; it's a failure waiting to happen. Use carriage bolts with washers and nuts for critical connections like swing hangers or attaching beams. Screws are fine for decking or smaller attachments, but for structural support, bolts are non-negotiable. Make sure everything is counter-sunk or covered to prevent snags.
Essential Hardware for Play Structures:
- Carriage bolts (various lengths and diameters)
- Washers (flat and lock washers)
- Nuts (hex nuts, nylon lock nuts)
- Structural screws (exterior grade)
- Lag screws (for heavy-duty connections)
- Swing hangers (bolt-through or lag screw type)
- Slide mounting hardware
Speaking of hardware, make sure you get the right swing hangers. Those cheap S-hooks that come with some swing sets? Ditch 'em. Invest in heavy-duty hangers that bolt or lag screw securely through the beam. You don't want a swing coming crashing down mid-air. It's a small detail that makes a massive difference in safety and longevity.
Soft Landings: Choosing the Right Surface
the structure is solid, but what's under it? Concrete, asphalt, or packed dirt are absolute no-gos for diy backyard playground equipment. Falls happen, and you need a surface that absorbs impact. Loose-fill options like wood mulch, engineered wood fiber (EWF), or sand are common. EWF is often recommended because it compacts slightly but still provides good shock absorption when deep enough (think 9-12 inches). Pea gravel is another option but can be a bit messy. Rubber mulch is great for impact absorption and low maintenance, but it can get hot in direct sun and has a higher upfront cost. Rubber tiles or mats are also excellent, providing a consistent, soft surface, though they are usually the most expensive.
Building Your Playground: Getting Started
Building Your Playground: Getting Started
Measuring Twice, Digging Once: Laying Out the Posts
Alright, lumber bought, plans in hand, permits (hopefully) sorted. Time to get dirty. The very first step in building your diy backyard playground equipment is transferring your paper plan to the actual patch of grass. This means marking where your main support posts will go. Grab a tape measure, some string, and stakes. Measure out the footprint of your structure precisely. Use the string to create straight lines and right angles. This isn't a suggestion; it's mandatory. If your posts aren't square and in the right spot now, everything else will be off, and fixing it later is a nightmare you don't want to experience. Think of this as the blueprint coming to life – accuracy is paramount.
Post Holes and Concrete: The Unsung Foundation Heroes
With your post locations marked, it's time to dig. You need holes deep enough to get below the frost line in your area (check local building codes for this depth) and wide enough to comfortably fit the post and concrete. A post hole digger is your friend here, though a shovel works if you're feeling particularly masochistic. Aim for holes roughly three times the width of your post. Drop your posts into the holes, ensuring they are perfectly plumb (vertically straight) using a level on two adjacent sides. Then, mix and pour concrete around the base. Brace the posts securely while the concrete cures – usually 24-48 hours before you put any real weight on them. Skipping the concrete step for main support posts is like building a house on Jell-O.
Minimum Post Hole Depth (Check Local Codes for Specifics):
- Small structures in warm climates: 24 inches
- Larger structures or colder climates: 36-48 inches or below frost line
- Hole Diameter: At least 3 times the post width
Raising the Beams: Building Upwards
Once the concrete is rock hard and your posts are standing proud and straight, you can start adding the horizontal beams that will support the deck, swings, or monkey bars. This is where having a helper or two makes a huge difference. Lifting heavy, long pieces of lumber into place is tricky solo. Bolt these beams securely to the posts using those heavy-duty carriage bolts we talked about earlier. Make sure everything is level as you go. This forms the main frame of your diy backyard playground equipment. From here, you'll add joists for the deck, hang swing beams, or attach the sides of your fort structure. It starts looking like a real playground pretty quickly at this stage.
Building Your Backyard Play Zone: The Final Word
So, you've navigated the lumber aisle, wrestled with concrete bags, and maybe even questioned your sanity during a particularly stubborn bolt situation. Building your own diy backyard playground equipment isn't a weekend whim for the faint of heart. It requires planning, sweat, and a willingness to learn as you go. But look at it now – a custom play structure tailored to your kids, built with your own hands, costing a fraction of the retail price. It stands as a testament to effort over convenience. While the big box store offers instant gratification, your backyard now holds something built with intention and likely a few scraped knuckles. That's a different kind of value entirely.